In the survival sandbox video game Valheim, players will travel from one place to another just to explore and look if the area they are exploring is worthy to have a settlement.
They will travel on land or in water, and considering that most of the places in the game are separated by a body of water, especially smaller ones that are usually found in the Meadows biome, players are trying to cross it mostly by foot.
However, this method was futile as walking in water, or swimming if they are travelling long distances on water, will give the players the Wet debuff. This debuff can lower one's health and stamina regeneration. It can a player a -25% Health Regen and -15% Stamina Regen.
Players can now avoid this by building bridges that connects the places that they can explore while preventing them from taking a Wet debuff and their stamina depleted if they are swimming in water.
READ ALSO: 'Valheim' Patch 0.155.7 Update Guide: How to Craft a Maypole + Other Patch Notes
Bridges can also serve as landmarks to help player orient themselves while exploring the area.
How to Build a Bridge - Walkway and Support
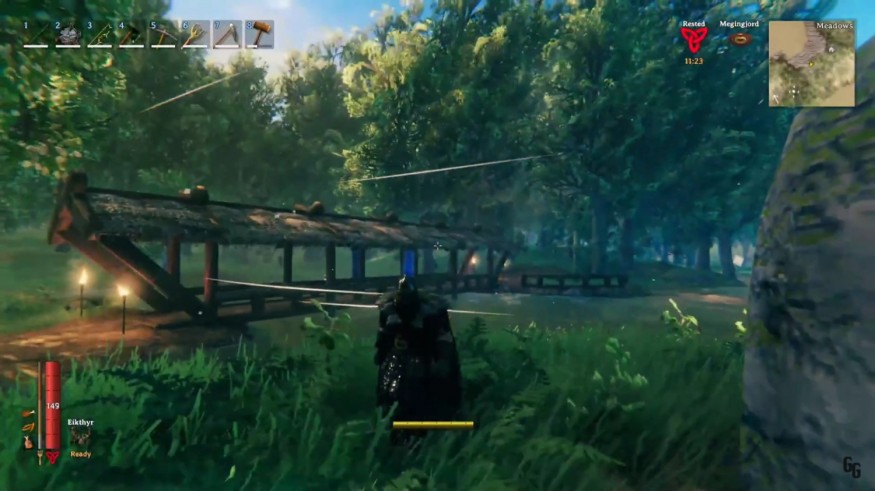
In a video tutorial made by GReimer Gaming on YouTube, building a bridge starts by amassing the resources that can be used.
In the video, core wood was used, which can be harvested by chopping down Pine Trees found in the Black Forest with a Stone axe. Tutorial also said that regular wood, which can be harvested from any tree or stump or through Greydwarf drops, can be used in building a bridge as well.
You will also need a Workbench that was built on either side of the bridge. This will both allow the construction of your buildings as we as crafting the items and parts needed.
Here are the steps to follow:
1. In order to start building the bridge, you must first build its walkway that will stretch across the body of water by laying down the 2x2 Wood Floor. You need to eyeball what kind of direction the walkway should go. This will serve as your guide.
2. Place two 2x2 Wood Floors at the start of your walkway, then place a 2x2 Wood Floor on top of one of it. Place another 2x2 Wood Floor underneath it, then destroy floor that is on top. If you destroy one 2x2 Wood Floor, you will receive Regular Wood that you can use in the future.
3. Do #2 as far as you can until you will reach a build Limit. From there, you will need to build the additional support for the bridge. To do this, you must need a 4m Log Pole. Place the 4m Log Pole right on top of the third wood floor of the walkway, then place another one beside it. After that, place another 4m Log Pole on the bottom of the that is on top of the wood floor.
4. Once that log pole was snapped and connected, chop down the log pole that inserted on the side, then continue on building your walkway. For every third wood floor, a log pole support beam is built.
5. Once you are in the other side, you need to clear out everything, including grass, plants, and rocks using your hoe and pickaxe. You can also use your pick axe to raise the ground where your bridge's walkway ends.
6. Once you done build the walkway and the one side of supports, you may proceed building the other wooden support beams on the other side. Simply do the same thing that you did in building the wooden support beams on the previous side.
7. Once you installed completed those wooden support beams on the other side, grab a 2m Wood Beam and start installing it on the bridge's sides. This will add additional stability to the bridge.
8. Once you line up the sides, take a 1m Wood Pole, and place it on every end of that wood beam that you installed on the side of the bridge. Once completed, go back your inventory grab 2m Wood Beams and place on top of those 1m Wood Poles. These will serve as handrails. Once done, you have your own basic bridge.
But if you want to protect yourself against the weather, you need to add in the roof.
How to Build a Bridge - Roof
To make the roof, take 2m Wood Beams then place on top of your support beams. Do this to both sides.
Once you're lined up those beams, extend your upper wood beams, then place your two 45-degree Wood Beams underneath both sides of the extended top wooden beams. Do the same to the other side of the bridge.
Once you've finished doing this, grab you 26-degree Wood Beams, and place them on top of either sides, then place a 26-degree Wood Roof Cross in the middle. After that, place the 26-degree Thatch Roof Ridge in the middle. This will line up in the center as well as allowing you to extend it on either side.
Then, take you 26-degree Thatched Roof, and from the inside, install it on the either side of the roof. Make sure that you need to turn it in order to install it on one side of the roof. From one end, remove the 26-degree Wood Beam on the either side as it was just placeholder from the 26-degree Wood Roof Cross.
Then, grab a new 26-degree Wood Beam and place on the side of the roof until it is attached to the one leg of the wood cross. Snap it there, then do the same on the other side, then on the other end of the bridge.
Continue building the roof by first installing the 26-degree Thatched Roof on one side first, then install the 26-degree Thatch Roof Ridge in the middle, the 26-degree Thatched Roof on the other side. Do this pattern continuously until reach the other side of the bridge.
For added realism, you can add those 26-degree Wood Roof Crosses and several beams as roof ribbings on top of the roof by going up of the bridge's floor.
Two blocks away from either one of the open end paths of the bridge, remove a patch of roof in the middle, then install the 26-degree Wood Roof Cross, then bring back the 26-degree Thatch Roof Ridge in the same place.
Then install 26-degree Wood Beams on the both sides until it appears that you've installed ribs in the ceiling. Do these steps for every third tile. This will give stability to both the bridge and the roof.
You can also decorate your bridge base on what you desire by adding banners on the side, lights on both ends, or anything that is suits your style.
READ ALSO: 'Ark: Survival Evolved' Patch 2.61 Update: What Bug Fixes, Changes Players Will Expect


